
Solar panel junction box repair demands precise technical expertise and careful attention to safety protocols. Diagnosing and fixing these critical components, which protect essential electrical connections from environmental damage, requires specialized knowledge to prevent system failures and maintain optimal performance. While troubleshooting common solar panel issues, junction box problems often manifest through decreased power output, visible physical damage, or moisture infiltration. This comprehensive guide outlines professional repair procedures, essential safety measures, and industry-standard techniques for restoring junction box functionality. Following manufacturer specifications and electrical codes is crucial, as improper repairs can compromise system integrity and void warranties. Before proceeding with any repairs, ensure you have the appropriate certifications and safety equipment to handle high-voltage DC connections.
Safety Precautions and Required Tools
Safety Equipment Requirements
When performing junction box repairs, proper safety equipment is essential and aligns with solar PV maintenance best practices. Required safety gear includes:
Insulated gloves rated for electrical work (Class 0 or higher), providing protection against electrical shock up to 1000V. Safety glasses or goggles with side shields to protect against debris and UV radiation. A properly rated multimeter for voltage testing, ensuring it’s suitable for DC measurements up to 1000V.
Additional mandatory equipment includes:
– Non-conductive hard hat for protection against falling objects
– Safety shoes with electrical hazard protection
– Arc-rated face shield when working with live components
– Insulated tools specifically designed for electrical work
– Fall protection equipment when working at heights
– Fire-resistant (FR) clothing or coveralls
All safety equipment must meet current industry standards and be inspected before each use. Replace any damaged or worn items immediately to maintain optimal protection levels during repair operations.
Essential Tools and Materials
Before attempting any solar panel junction box repairs, ensure you have the following essential tools and materials readily available:
Safety Equipment:
– Insulated gloves rated for electrical work
– Safety glasses
– Non-conductive tools
– Multimeter for voltage testing
– Proper protective clothing
Primary Tools:
– Precision screwdrivers (both flathead and Phillips head)
– Wire strippers and cutters
– Soldering iron with lead-free solder
– Heat gun or hot air station
– Crimping tool for MC4 connectors
– Digital inspection camera (recommended for detailed examination)
Repair Materials:
– Replacement junction box (if needed)
– UV-resistant silicone sealant
– Diodes matching original specifications
– MC4 connectors
– Solar-grade copper wire
– Heat shrink tubing
– Electrical tape rated for outdoor use
– Non-corrosive flux for soldering
– Cleaning solutions and lint-free cloths
Additional Equipment:
– Work platform or ladder for roof access
– Portable lighting
– Anti-static mat
– Documentation tools (camera, notepad)
Store all materials in a clean, dry environment and inspect tools regularly for damage or wear before use.

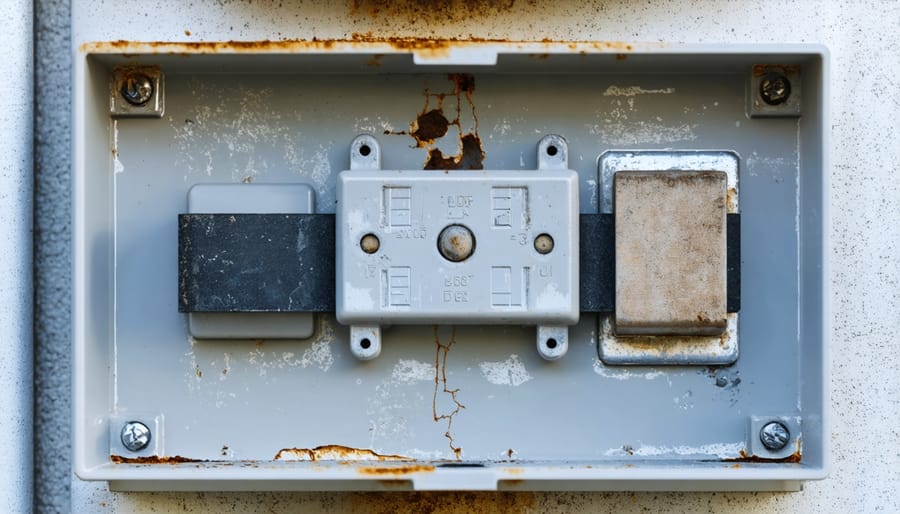
Diagnosing Junction Box Problems
Visual Inspection Techniques
Begin the visual inspection by ensuring the solar system is completely powered down. When troubleshooting solar system problems, a thorough examination of the junction box is essential.
First, inspect the external housing for any visible damage, cracks, or discoloration. Pay particular attention to the seals around the edges and cable entry points, as these are common areas for water ingress. Check that the mounting screws are secure and free from corrosion.
Remove the junction box cover carefully, following manufacturer guidelines. Examine the internal components systematically:
1. Check all wire connections for signs of burning, corrosion, or loose terminals
2. Inspect the bypass diodes for discoloration or physical damage
3. Look for moisture indicators such as water stains or mineral deposits
4. Verify the condition of the potting compound if present
5. Examine the backsheet around the junction box for delamination
Document any findings with detailed notes and photographs for reference. If you observe multiple issues, prioritize addressing water-related damage first, as this can lead to catastrophic failure if left unattended.
Use a magnifying glass for closer inspection of small components and take particular care when examining the interface between the junction box and the panel surface. Any separation here requires immediate attention to prevent moisture infiltration.
Common Failure Points
Junction box failures in solar panels typically manifest through several identifiable issues that can significantly impact system performance. The most prevalent failure point is water ingress due to deteriorated seals or damaged housing, leading to corrosion of internal components and electrical connections. This often results in reduced power output or complete circuit interruption.
Diode failures represent another critical point of concern. These components can fail either open or short, with open failures causing partial power loss and short failures potentially leading to hotspots and reduced panel efficiency. Regular thermal imaging can detect these issues before they escalate into more serious problems.
Cable connection points within the junction box frequently experience degradation due to thermal cycling and environmental stress. Loose connections can cause arcing, while corroded terminals may increase resistance and heat generation. These issues often manifest as burning smells, discoloration of the junction box, or visible damage to the surrounding area.
Cracked or damaged housing is particularly problematic as it compromises the junction box’s IP rating. This can occur due to physical impact, extreme weather conditions, or poor installation practices. Signs include visible cracks, deformation, or separation from the panel surface.
Manufacturing defects, though less common, can manifest as improper potting compound application or substandard component quality. These issues may not be immediately apparent but can lead to premature failure under normal operating conditions.
Step-by-Step Repair Process
Preparing the Work Area
Before beginning any repair work on a solar panel junction box, ensure you have a clean, dry, and well-lit workspace. First, disconnect the solar panel from the system by turning off all relevant circuit breakers and switches. Use a multimeter to verify there is no voltage present in the system.
Clear the area around the solar panel, removing any debris or obstacles that might interfere with your work. If working on a rooftop installation, set up appropriate fall protection equipment and ensure stable footing. For ground-mounted systems, use a sturdy platform or work table at a comfortable height.
Carefully clean the area around the junction box using isopropyl alcohol and a lint-free cloth to remove dirt, dust, and oxidation. This ensures proper adhesion for any sealants you may need to apply later. Position your tools and replacement parts within easy reach, and set up adequate lighting to illuminate the work area.
Keep a non-conductive mat beneath your work area to prevent accidental shorts and protect components from static electricity. Have a partner present whenever possible for safety and assistance.
Repairing Loose Connections
Loose connections within the solar panel junction box can significantly impact system performance and pose safety risks. Begin by ensuring the system is completely disconnected and de-energized before proceeding with any repairs. Using appropriate electrical testing equipment, verify the specific connection points that require attention.
Carefully remove the terminal block cover to access the connection points. Inspect the wire terminations for signs of corrosion, burning, or physical damage. If corrosion is present, clean the affected areas using an appropriate electrical contact cleaner and a soft brush. For burned or damaged terminals, these components must be replaced entirely to ensure safe operation.
When re-establishing connections, strip approximately 10mm of insulation from the wire ends using properly sized wire strippers. Twist the exposed conductor strands tightly and insert them fully into the terminal blocks. Apply the manufacturer-specified torque when tightening the terminal screws – typically between 1.5 and 2.0 Nm for standard PV junction boxes. Over-tightening can damage the terminals, while under-tightening may lead to future connection failures.
For crimped connections, use only industry-approved crimping tools and connectors rated for photovoltaic applications. After completing repairs, verify all connections are secure by performing a gentle pull test. Finally, seal the junction box properly, ensuring the gasket is correctly positioned to maintain the IP rating and prevent moisture ingress.
Sealing and Waterproofing
After completing the repair work, proper sealing and waterproofing of the junction box is crucial to ensure long-term reliability and protection against environmental elements. Begin by thoroughly cleaning the junction box surface and surrounding areas with isopropyl alcohol to remove any residue, dirt, or moisture. Allow the surface to dry completely before proceeding.
Apply a continuous bead of UV-resistant silicone sealant around the perimeter where the junction box meets the solar panel. Ensure the sealant creates a complete, unbroken seal without gaps or bubbles. For enhanced protection, consider using specialized PV junction box sealants rated for extreme weather conditions and temperature variations.
If the junction box features a removable lid, inspect and replace the gasket if showing signs of wear or degradation. Apply a thin layer of dielectric grease to the gasket to maintain flexibility and improve sealing effectiveness. When securing the lid, tighten screws in a cross-pattern sequence to ensure even pressure distribution.
Test the waterproofing by performing a controlled water test, carefully observing for any signs of water ingress. Pay special attention to cable entry points, ensuring glands or grommets are properly sealed and cables maintain appropriate strain relief. Document the repair date and sealant type used for future reference and maintenance planning.
For installations in particularly harsh environments, consider applying an additional layer of UV-resistant protective tape around the junction box edges as a secondary moisture barrier.

Testing and Verification
After completing the repair, thorough testing is essential to ensure proper solar panel system functionality. Begin by conducting a visual inspection of the sealed junction box, checking for any gaps or inconsistencies in the sealant application. Using a multimeter, measure the voltage and current output across the junction box terminals to verify electrical continuity. The readings should match the panel’s specifications within acceptable tolerances.
Perform insulation resistance testing between the conductors and ground to confirm proper isolation. The measurement should exceed 100 megaohms under dry conditions. Apply a light water spray test around the junction box to verify weatherproof integrity, ensuring no moisture infiltration occurs.
Monitor the panel’s performance for at least one full sunny day, comparing its output with historical data or similar panels in the array. Document all test results, including voltage readings, insulation resistance values, and weather conditions during testing. If any parameters fall outside expected ranges, review the repair work and make necessary adjustments before returning the system to service.
The successful repair of a solar panel junction box requires careful attention to detail, proper diagnostic procedures, and adherence to safety protocols. Throughout this guide, we’ve covered essential aspects of junction box repair, from initial troubleshooting to final testing and validation. Remember that maintaining the integrity of your solar panel’s junction box is crucial for optimal system performance and longevity.
Regular inspection of junction boxes should be incorporated into your maintenance routine, with particular attention to signs of water ingress, thermal damage, or loose connections. Prevention is often more cost-effective than repair, so ensuring proper installation and maintaining adequate weather sealing can prevent many common issues from developing.
For professional installers and technicians, it’s essential to keep detailed records of repairs and maintain an inventory of compatible replacement components. When performing repairs, always use manufacturer-approved materials and follow relevant electrical codes and safety standards. The investment in proper tools and high-quality replacement parts will pay dividends in repair durability and system reliability.
While some repairs can be performed by experienced DIY enthusiasts, complex issues should be referred to certified professionals. Regular training and staying current with industry standards and best practices will ensure the highest quality repair outcomes. Remember that a properly functioning junction box is crucial for both system performance and safety, making thorough repair procedures and validation testing non-negotiable aspects of the maintenance process.