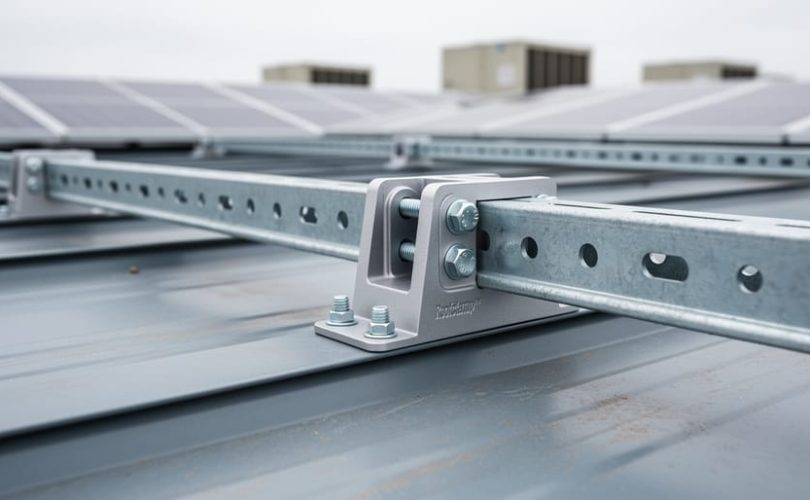
Installing Unistrut rooftop support systems for photovoltaic arrays requires three essential components: non-penetrating attachment methods that preserve roof warranties, proper load distribution across the roof structure, and materials engineered to withstand decades of environmental exposure. The process centers on Roofclamp™ attachment technology, which connects Unistrut metal framing to standing seam roof ribs without drilling or piercing the metal panels. This approach delivers a stable mounting platform while maintaining the roof’s weatherproof integrity.
The Roofclamp™ system addresses a critical challenge in commercial and industrial solar installations: how to create robust mechanical support without compromising the roof’s waterproofing. Traditional penetrating fasteners create leak points and often void warranty coverage. By contrast, aluminum Roofclamp™ units use stainless steel oval-tipped screws that grip standing seam ribs up to 1.5 inches wide without penetrating the panel. The single-piece design incorporates three set screws rather than the one or two found in competing products, distributing clamping force more evenly and reducing the risk of rib deformation.
Beyond attachment mechanics, the structural considerations matter equally. Rooftop supports must distribute concentrated photovoltaic module loads across sufficient roof area to avoid exceeding membrane or structural capacity limits. Environmental durability proves equally critical, as systems face years of thermal cycling, UV exposure, precipitation, and wind loading. Pre-galvanized Unistrut, the standard finish in commercial applications, provides the corrosion resistance necessary for multi-decade service life in exposed conditions.
Tools, Materials, and Equipment You’ll Need
Proper installation of Unistrut rooftop support depends on having the right tools and materials ready before you step onto the roof. Missing even a single component can halt work and compromise safety, so gather everything in advance and verify completeness.
You’ll need several categories of equipment to complete the installation correctly:
- Measurement and Layout Tools: Tape measure (minimum 25 feet), chalk line or marking pen, level (both 2-foot and 4-foot recommended), and square for verifying alignment
- Hand Tools: Adjustable wrenches, socket set, screwdrivers (Phillips and flathead), and wire cutters for any trimming needs
- Torque Wrench: Essential for applying correct fastener tension without over-tightening, which can damage components or under-tightening, which risks structural failure
- Unistrut Components: Pre-galvanized Unistrut channel (the standard corrosion-resistant finish), appropriate length based on your array layout, and connector plates where rails join
- Roofclamp™ Hardware: RC or RCT clamps sized for your standing seam ribs (both accommodate ribs up to 1.5″ wide), with stainless steel oval-tipped screws included in each one-piece unit
- Safety Equipment: Fall protection harness, anchor points, hard hat, non-slip footwear, and work gloves
The torque wrench deserves special attention because the three set screws in each Roofclamp™ require precise tightening to create a secure grip on the standing seam without deforming the rib. Hand-tightening or guessing torque values risks either inadequate attachment or rib damage.
Pre-galvanized Unistrut is specified because it must withstand extreme weather, temperature swings, moisture exposure, and corrosion over the installation’s lifespan. The galvanized coating provides this durability while maintaining structural integrity for proper load distribution across the roof membrane. The Roofclamp™ aluminum body and stainless steel screw combination similarly resists environmental degradation while the oval tip design protects the roof panel from penetration, preserving manufacturer warranties.
Having all components staged and organized before beginning saves time and reduces the risk of errors during installation when you’re focused on proper positioning and attachment.
Critical Safety Warnings and Pre-Installation Checks
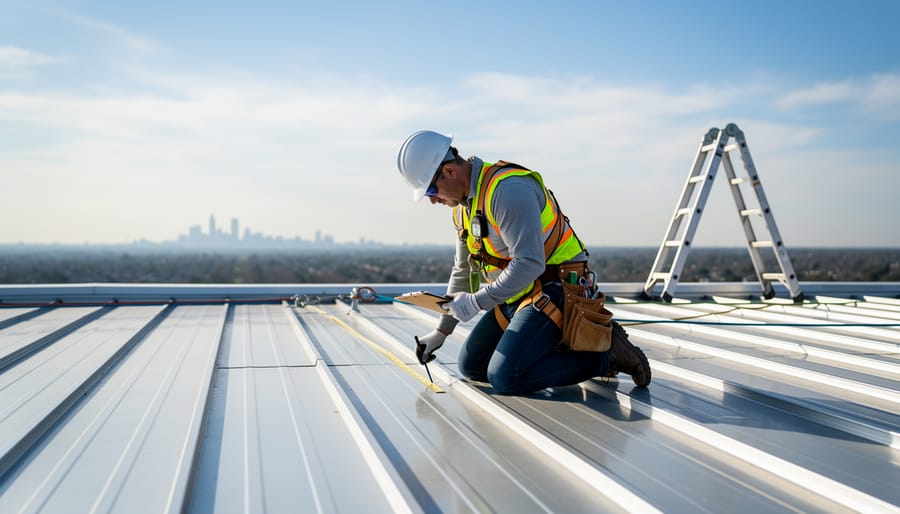
Before you climb onto the roof, understand that Unistrut installation involves serious hazards that demand strict safety protocols. Falling from height, structural collapse, and environmental exposure can all cause severe injury or death without proper precautions.
Secure a proper fall arrest system before stepping onto the roof. Personal protective equipment isn’t optional, full-body harnesses, anchor points rated for your work area, and guardrails where feasible are minimum requirements. Check local building codes for specific fall protection thresholds; many jurisdictions mandate protection at four feet or lower.
Weather creates additional risks. High winds can destabilize workers and materials. Wet metal surfaces become dangerously slippery. Extreme heat turns rooftops into exhausting environments that impair judgment. Schedule installation during stable conditions and monitor forecasts continuously.
Your pre-installation inspection determines whether the project can proceed safely. Walk the entire roof to identify damaged panels, rust, or compromised seams. Standing seam ribs must be intact and structurally sound, the Roofclamp™ system depends on firm attachment points. Measure seam width to confirm roof compatibility; ribs exceeding 1.5″ won’t accept standard RC or RCT clamps.
Structural capacity verification is non-negotiable. The roof must support the combined dead load of the Unistrut rails, PV modules, and any snow or wind loads specific to your climate zone. If you’re working with B-roof design or unfamiliar roof types, consult structural engineering documentation before proceeding. Proper load distribution prevents membrane damage and catastrophic failure over the system’s lifespan.
Understanding Unistrut and Roofclamp™ Components for PV Mounting
Why Material Selection Matters for Load Design
Choosing the right materials for your Unistrut rooftop support directly affects how well your system handles weight over time. Pre-galvanized Unistrut serves as the industry standard because it resists corrosion in harsh conditions, extreme heat, freezing temperatures, persistent moisture, and UV exposure that would degrade lesser materials. This durability matters because your mounting system must maintain its integrity for decades, matching the operational lifespan of the solar panels it supports.
Material quality connects directly to structural load design. A rooftop support that corrodes or weakens redistributes stress unevenly across the roof membrane, potentially creating concentrated pressure points that damage the roof structure. Pre-galvanized finishes maintain consistent strength, ensuring the load from your PV array spreads evenly across attachment points as originally engineered.
When combined with aluminum Roofclamp™ hardware and stainless steel fasteners, this material selection creates a system designed to last the life of the roof. These components work together to distribute static and dynamic loads, wind uplift, snow accumulation, thermal expansion, without compromising the roof membrane or voiding manufacturer warranties. Material durability isn’t just about preventing rust; it’s about maintaining predictable load distribution throughout the system’s service life.
Roofclamp™ Sizes and Standing Seam Compatibility
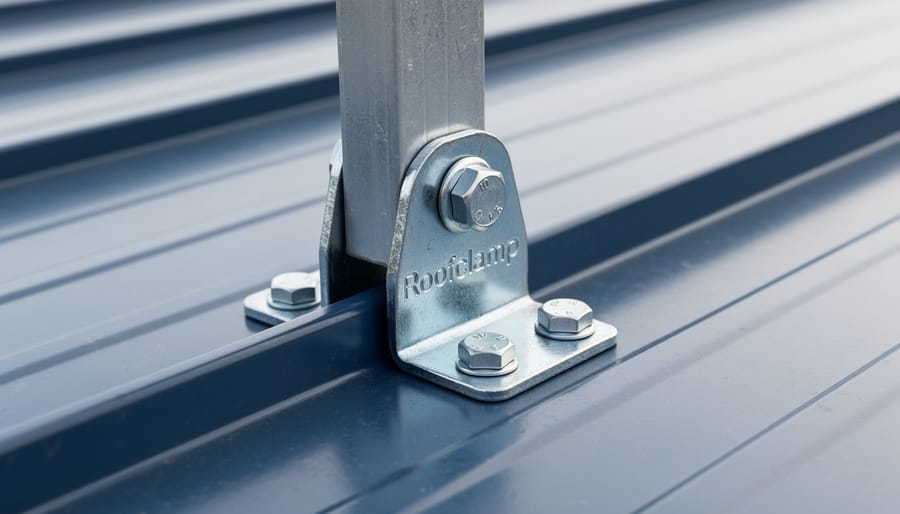
Roofclamp™ systems are available in two sizes, RC and RCT, to accommodate different roof profiles and installation requirements. Both sizes work with standing seam ribs up to 1.5″ wide, providing flexibility across most commercial and residential roofing configurations. This width range covers the majority of standard standing seam profiles found in typical installations, including Q-Deck roofs commonly used in commercial applications.
Selecting the correct size depends on your specific seam profile width and height. Measure the standing seam rib at the attachment point to determine which Roofclamp™ size provides optimal contact and clamping force. The RC model typically suits narrower seam profiles, while the RCT accommodates wider configurations within the 1.5″ maximum.
Both sizes feature identical core functionality: aluminum construction for corrosion resistance, three set screws for secure attachment, and a stainless steel oval-tipped screw that grips without penetrating the panel. This design preserves your roof warranty while creating secure anchor points for Unistrut rails. When in doubt about sizing, consult your roof’s technical specifications or measure several seam locations, as profiles can vary across a single roof surface.
Step-by-Step Installation Process
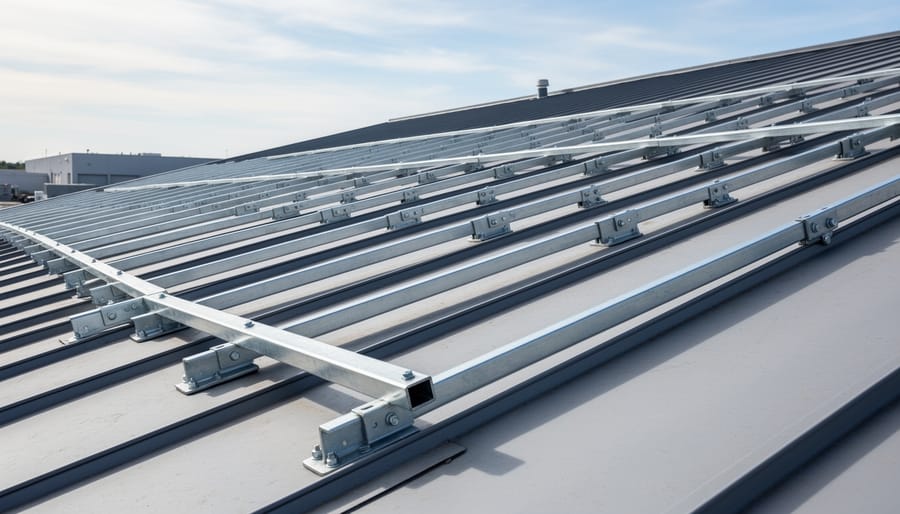
Step 1: Plan and Mark Your Unistrut Layout
Before you position a single Roofclamp™, you need an accurate layout plan that distributes load evenly across the roof structure. Proper planning at this stage prevents costly adjustments later and ensures your installation meets structural requirements.
Start by reviewing your PV array dimensions and module layout. Measure the total array footprint and determine how many parallel Unistrut rails you’ll need to support the modules. Calculate the required spacing between rails based on your module mounting points, typically manufacturers specify attachment intervals that maintain structural integrity.
Mark the standing seam rib locations where Roofclamp™ units will attach. Use a measuring tape and chalk line to map rail positions that align with available seam ribs. Since Roofclamp™ connects only to standing seam ribs up to 1.5″ wide, verify each marked location uses a compatible seam profile.
Space your Roofclamp™ attachment points to create a stable base that adequately distributes the load on the roof membrane. Avoid concentrating support points in small areas, which can create stress concentrations. Instead, spread attachment locations across the array footprint to balance weight distribution.
Document your layout measurements and mark positions clearly on the roof surface using non-permanent markers. This reference map guides your installation sequence and helps maintain consistent spacing throughout the process.
Step 2: Position Roofclamp™ on Standing Seam Ribs
Center each Roofclamp™ unit directly over a standing seam rib at the marked layout points from your planning step. The aluminum body should straddle the rib symmetrically, with equal overhang on both sides. Confirm the seam width falls within the 1.5″ maximum capacity for both RC and RCT sizes before proceeding.
Orient the clamp so the stainless steel oval-tipped screw faces the panel surface, ready to press against the metal without piercing it. Check that the three set screw positions align properly with the rib profile, misalignment here compromises load distribution and stability later.
Slide the unit along the seam if needed to reach the exact position where the Unistrut rail will mount. The one-piece construction allows quick repositioning without disassembly. Verify each clamp sits flat and stable before moving to attachment, as proper seating ensures the load transfers correctly to the roof structure beneath.
Step 3: Attach Roofclamp™ to Seam Ribs
Begin by positioning the first Roofclamp™ unit over the standing seam rib where you marked your layout points. The one-piece aluminum design simplifies this process compared to multi-component clamps.
Start with the three set screws. Thread each screw into the Roofclamp™ body by hand, turning them clockwise to engage the threads. Do not tighten yet. Distribute the three set screws evenly around the clamp body to create balanced pressure against the seam rib.
Once all three set screws are finger-tight, tighten them progressively in a star pattern. Turn the first screw a quarter turn, then move to the screw opposite it, and continue alternating. This sequence prevents uneven pressure that could distort the seam or misalign the clamp. Use a hex key or appropriate tool to secure each screw firmly, but avoid overtightening, which could damage the rib.
After securing the set screws, install the stainless steel oval-tipped screw through the designated opening in the Roofclamp™. This screw contacts the seam rib without piercing the metal panel underneath. The oval tip design distributes pressure across the seam surface rather than creating a penetration point, which preserves the roof manufacturer’s warranty coverage and maintains the waterproof integrity of your roofing system.
Step 4: Install Unistrut Rails
With the Roofclamp™ units securely attached to the standing seam ribs, you’re ready to install the pre-galvanized Unistrut rails that will form the mounting framework for your PV array.
Begin by lifting the first Unistrut rail into position across the row of installed Roofclamp™ units. The rail should rest in the channel or bracket on top of each clamp. Have a helper support the opposite end while you work to prevent the rail from sliding off before it’s secured.
Insert the appropriate mounting bolts through the Unistrut channel holes and into the Roofclamp™ attachment points. Finger-tighten the hardware first, allowing some adjustment before final tightening. This flexibility lets you make small corrections to ensure the rail sits perfectly level.
Use a spirit level to check the rail alignment in both directions: lengthwise along the seam and across to adjacent rails. Adjust as needed by loosening bolts, repositioning slightly, and retightening. This step is critical because a level framework ensures proper load distribution across the roof membrane and prevents stress concentration at any single point.
Once aligned, torque all mounting bolts to the manufacturer’s specifications using your torque wrench. Work systematically from one end to the other, which helps maintain alignment as you lock everything down. Repeat this process for each parallel Unistrut rail until your complete grid is installed and verified level.
Step 5: Verify Alignment and Load Distribution
After securing all Unistrut rails to the Roofclamp™ units, run a systematic inspection before mounting any PV equipment. Start by checking rail alignment: lay a straightedge or taut string across multiple rails to confirm they sit parallel and level. Misaligned rails will create uneven stress points when modules are attached, potentially compromising the load distribution your roof membrane requires.
Walk along each rail and verify every Roofclamp™ connection point remains tight. Gently apply upward pressure to test for movement, properly installed clamps should not shift or rotate on the seam ribs. Check that the stainless steel oval-tipped screws are fully seated without over-tightening, which could deform the standing seam.
Count your attachment points and compare them against your layout plan. The load must be distributed across sufficient connection locations to prevent concentrated stress on any single roof section. Examine the spacing between Roofclamp™ units: too few support points will overload individual seams, while proper distribution creates a stable base that shares the array weight evenly across the roof structure.
Step 6: Perform Final Quality and Safety Checks
After completing the physical installation, a systematic quality assurance review confirms your Unistrut rooftop support system meets structural mounting standards and will perform reliably over its expected lifespan.
Begin with torque verification. Revisit each Roofclamp™ attachment point and confirm that all three set screws and the stainless steel oval-tipped screw are properly tightened to manufacturer specifications. Use a calibrated torque wrench rather than estimating tightness by feel, this ensures consistent clamping force across all attachment points without over-tightening, which could damage the standing seam ribs.
Test structural stability by applying gentle lateral pressure to installed Unistrut rails at several points along their length. The system should feel rigid with no shifting, rocking, or play at connection points. Check that Roofclamp™ units remain firmly seated on the seam ribs and haven’t slipped during rail installation.
Verify load distribution by visually inspecting spacing between attachment points. Confirm that Roofclamp™ units are positioned to spread anticipated PV array weight evenly across the roof structure, preventing concentrated stress on any single area of the membrane.
Document your installation with photographs of completed attachment points, measurements of spacing intervals, and notes on any site-specific conditions. This record supports future maintenance schedules and demonstrates compliance with rooftop PV structural mounting requirements.
Testing Your Installation and Next Steps
After completing the installation steps, conduct a thorough verification to ensure your Unistrut rooftop support system meets structural requirements and is ready for PV module mounting. Start by performing a hands-on stability test: apply firm manual pressure to each Unistrut rail at multiple points to check for movement, flex, or shifting. The system should feel solid with no detectable play at the Roofclamp™ attachment points.
Verify that your installation meets these critical criteria:
- All Roofclamp™ units are tightly secured to standing seam ribs with no visible gaps or misalignment
- Unistrut rails are level and properly positioned to distribute load evenly across the roof structure
- Set screws on each Roofclamp™ are torqued to specification and the stainless steel oval-tipped screw shows proper engagement without panel penetration
- Installation documentation includes photographs of completed work, Roofclamp™ positions, and any roof condition observations
Document your installation with detailed notes and images showing the final layout, spacing measurements, and attachment points. This record proves invaluable for future maintenance and warranty claims. Because the Roofclamp™ system is designed to last the life of the roof, routine inspections typically align with standard roof maintenance schedules, generally every two to three years for commercial installations. During these checks, examine the Roofclamp™ attachments for signs of loosening and verify that the pre-galvanized Unistrut maintains its corrosion resistance under environmental exposure to extreme weather, heat, cold, and water.
Once verification is complete, your rooftop support system provides the stable base needed to adequately distribute the load on the roof membrane, and you’re ready to proceed with PV module mounting according to your array design specifications.
Common Installation Questions
Installers who are new to Roofclamp™ systems often ask about the practical aspects of working with these non-penetrating attachments. Below are answers to the most common questions based on verified installation specifications and product design features.
Will the Roofclamp™ void my roof warranty?
No. The aluminum Roofclamp™ uses a stainless steel oval-tipped screw that does not pierce or penetrate the panel, which preserves the manufacturer’s warranty coverage on standing seam roofs.
How quickly can I install these clamps compared to traditional mounting systems?
The Roofclamp™ is designed for fast and easy installation, with its one-piece construction and three set screws simplifying the attachment process. Installation speed varies with crew experience and roof complexity, but the non-penetrating design eliminates the need for roof sealing steps required with other methods.
What standing seam widths are compatible with Roofclamp™?
Roofclamp™ units (available in RC and RCT sizes) work with standing seam ribs up to 1.5 inches wide, covering the majority of commercial and residential standing seam roof profiles.
How long will the Roofclamp™ and Unistrut system last on my roof?
The system is designed to last the life of the roof when properly installed. Pre-galvanized Unistrut provides corrosion resistance, and both components are built to withstand environmental conditions including extreme weather, heat, cold, water exposure, and corrosion.
Material selection plays a crucial role in long-term performance. Pre-galvanized Unistrut is the standard finish specifically because it offers reliable corrosion protection in outdoor rooftop environments. The combination of corrosion-resistant materials and non-penetrating attachment ensures that your rooftop support maintains its structural integrity throughout the service life of both the roof and the PV array it supports.
Understanding these practical considerations helps you set realistic expectations for your installation project and communicate confidently with clients or stakeholders about system performance and warranty protection.
Proper installation of Unistrut rooftop support systems forms the foundation for safe, durable PV arrays that perform reliably over decades. By following the systematic workflow outlined in this guide, from thorough pre-installation checks through final verification, you ensure your mounting system meets structural load requirements while protecting the roof membrane and preserving manufacturer warranties. The non-penetrating Roofclamp™ design, combined with pre-galvanized Unistrut engineered to withstand extreme weather and corrosion, creates a stable platform designed to last the life of the roof.
Mastering these installation techniques requires both hands-on practice and solid theoretical understanding of rooftop PV structural mounting principles. Mose Solar collaborates with universities to develop comprehensive training programs that equip aspiring photovoltaic professionals with the practical skills and engineering knowledge needed for proper system design and installation. These educational partnerships ensure that the next generation of renewable energy professionals understands not just the steps, but the underlying load distribution, material selection, and safety considerations that make installations successful.